Getting Started with Chef Server. Part 2
WARNING: This article can be outdated. Better read my book about Chef: Cooking Infrastructure by Chef
Hello my dear friends. Today we will continue talk about Chef Server. All example code you can find here: github.com/le0pard/chef-server-example/tree/2.0.
In the previous article we learned Chef what is Chef Server and how to setup it. In this article we will learn how to work with it.
Directory .chef
In previous article we setuped chef server and added to it one node (server). We use for an authentication with chef server ssh keys. Also for knife we have configuration in knife.rb. All this stuff should be in “.chef” directory. This is our modified knife.rb file (fixed paths for keys):
log_level                :info
log_location             STDOUT
node_name                'admin'
client_key               File.expand_path('../admin.pem', __FILE__)
validation_client_name   'chef-validator'
validation_key           File.expand_path('../chef-validator.pem', __FILE__)
chef_server_url          'http://10.33.33.33'
syntax_check_cache_path  'syntax_check_cache'
cookbook_path            [ './cookbooks', './site-cookbooks' ]
When a node runs the chef-client for the first time, it generally does not yet have an API client identity, and so it cannot make authenticated requests to the server. This is where the validation client—known as the chef-validator—comes in. When the chef-client runs, it checks if it has a “client_key”. If the client key does not exist, it then attempts to borrow the identity of the chef-validator to register itself with the server (“validation_key”).
Attribute Precedence
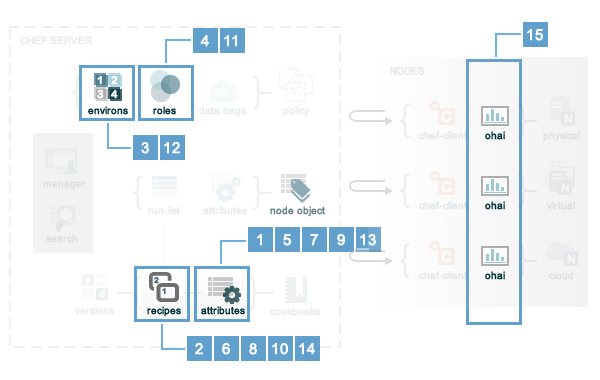
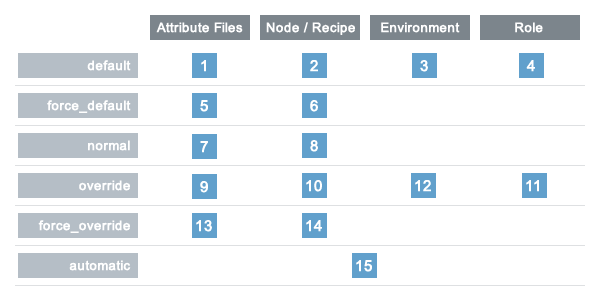
Attributes are always applied by the chef-client in the following order:
- A default attribute located in an attribute file
- A default attribute located in a recipe
- A default attribute located in an environment
- A default attribute located in role
- A force_default attribute located in an attribute file
- A force_default attribute located in a recipe
- A normal attribute located in an attribute file
- A normal attribute located in a recipe
- An override attribute located in an attribute file
- An override attribute located in a recipe
- An override attribute located in a role
- An override attribute located in an environment
- A force_override attribute located in an attribute file
- A force_override attribute located in a recipe
- An automatic attribute identified by Ohai at the start of the chef-client run
Attribute precedence, viewed from the same perspective as the overview diagram, where the numbers in the diagram match the order of attribute precedence:
Power of enviroments
An environment is a way to map an organization’s real-life workflow to what can be configured and managed when using server. Every organization begins with a single environment called the _default environment, which cannot be modified (or deleted). Additional environments can be created to reflect each organization’s patterns and workflow. For example, creating production, staging, testing, and development environments. Generally, an environment is also associated with one (or more) cookbook versions.
A per-environment run-list is a run-list that is associated with a role and a specific environment. More than one environment can be specified in a role, but each specific environment may be associated with only one run-list. If a run-list is not specified, the default run-list will be used. For example:
{
  "name": "webserver",
  "default_attributes": {
  },
  "json_class": "Chef::Role",
  "env_run_lists": {
    "production": [],
    "preprod": [],
    "test": [ "role[base]", "recipe[apache]" "recipe[apache::copy_test_configs]" ],
    "dev": [ "role[base]", "recipe[apache]", "recipe[apache::copy_dev_configs]" ]
    },
  "run_list": [ "role[base]", "recipe[apache]" ],
  "description": "The webserver role",
  "chef_type": "role",
  "override_attributes": {
  }
}
where:
- “webserver” is the name of the role
- “env_run_lists” is a hash of per-environment run-lists for production, preprod, test, and dev
- “production” and “preprod” use the default run-list because they do not have a per-environment run-list
- “run_list” defines the default run-list
Chef server and SSL self-signed certificate
By default, as you remember from previous article Chef working only on https protocol (security!). But this can be problem, if you don’t want buy valid ssl certificate for your chef server, because each command to chef server by knife will give you error with invalid ssl. Most simple solution - disable https and working only on http. For this lets modify our chef.json role:
{
  "name": "chef",
  "chef_type": "role",
  "json_class": "Chef::Role",
  "description": "The base role for Chef Server",
  "default_attributes": {
    "chef-server": {
      "api_fqdn": "10.33.33.33",
      "configuration": {
        "chef-server-webui": {
          "enable": true,
          "web_ui_admin_user_name": "admin",
          "web_ui_admin_default_password": "password"
        },
        "nginx": {
          "url": "http://10.33.33.33",
          "enable_non_ssl": true
        },
        "bookshelf": {
          "url": "http://10.33.33.33"
        }
      }
    }
  },
  "run_list": [
    "recipe[chef-server]"
  ]
}
I added section “nginx”, which allow us to work by http protocol with Chef server and “bookshelf”, which should write url to chef server without https. If we leave https, in this case bookshelf will be available only by https.
Cookbooks, roles and nodes on chef server
In comparison with Chef Solo, Chef Server store all information on server and use only this information for “cooking” nodes. So we should know, how to upload our roles, cookbooks and nodes on server. First of all we should install vender cookbooks localy by Berkshelf:
$ berks install --path cookbooks
Installing chef-server (2.0.0) from git: 'git://github.com/opscode-cookbooks/chef-server.git' with branch: '18d6e951a2daa1154b7e82c8909bb7245e57ec1b'
Let’s add python chef cookbook to Berkshelf and run this command again:
$ berks install --path cookbooks
Installing chef-server (2.0.0) from git: 'git://github.com/opscode-cookbooks/chef-server.git' with branch: '18d6e951a2daa1154b7e82c8909bb7245e57ec1b'
Installing python (1.4.1) from git: 'git@github.com:opscode-cookbooks/python.git' with branch: 'f932b3649683b58f7b0fb06a8b43eab2c6f24486'
Using build-essential (1.3.4)
Using yum (2.1.0)
As you can see dependencies downloaded automatically. Right now we have this cookbooks only in our local directory “cookbooks”. Let’s upload its to Chef Server. To solve this task we can use knife:
$ knife cookbook upload --all --cookbook-path cookbooks
Uploading build-essential [1.3.4]
Uploading chef-server  [2.0.0]
Uploading python       [1.4.1]
Uploading yum          [2.1.0]
Uploaded all cookbooks.

$ knife cookbook upload --all --cookbook-path site-cookbooks # don't forget about own custom cookbooks in 'site-cookbooks' folder
or we can use berkshelf:
$ berks upload
Installing chef-server (2.0.0) from git: 'git://github.com/opscode-cookbooks/chef-server.git' with branch: 'master' at ref: '18d6e951a2daa1154b7e82c8909bb7245e57ec1b'
Installing python (1.4.1) from git: 'git@github.com:opscode-cookbooks/python.git' with branch: 'master' at ref: 'f932b3649683b58f7b0fb06a8b43eab2c6f24486'
Using build-essential (1.3.4)
Using yum (2.1.0)
Uploading chef-server (2.0.0) to: 'http://10.33.33.33:80/'
Uploading python (1.4.1) to: 'http://10.33.33.33:80/'
Uploading build-essential (1.3.4) to: 'http://10.33.33.33:80/'
Uploading yum (2.1.0) to: 'http://10.33.33.33:80/'
If you actively develop some cookbook, sometimes you don’t want change version each time for little fix. But Chef server by default will not allow upload the same versions of cookbook:
$ knife cookbook upload --all --cookbook-path cookbooks
Uploading build-essential [1.3.4]
Uploading chef-server    [2.0.0]
Uploading python         [1.4.1]
Uploading yum            [2.1.0]
ERROR: Version 1.3.4 of cookbook build-essential is frozen. Use --force to override.
WARNING: Not updating version constraints for some cookbooks in the environment as the cookbook is frozen.
Uploaded all cookbooks.
As you can see we can forse update cookbooks by option “–force”:
$ knife cookbook upload --all --force --cookbook-path cookbooks
Uploading build-essential [1.3.4]
Uploading chef-server    [2.0.0]
Uploading python         [1.4.1]
Uploading yum            [2.1.0]
Uploaded all cookbooks.
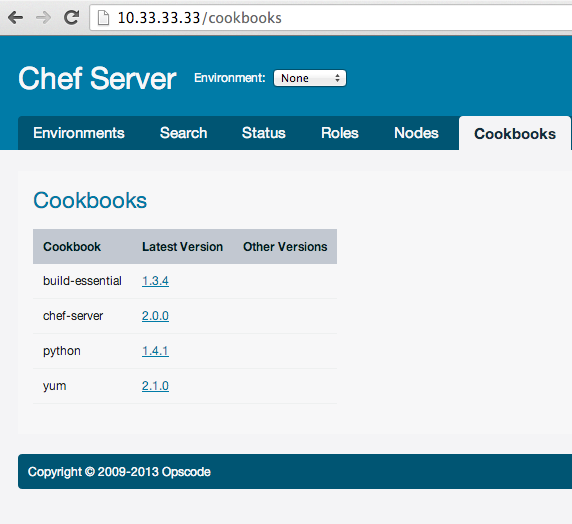
You can see all your cookbooks in web interface (if you enable it):
Next we want upload or update roles on server. It’s also easy:
$ knife role from file roles/*.json
Updated Role chef!
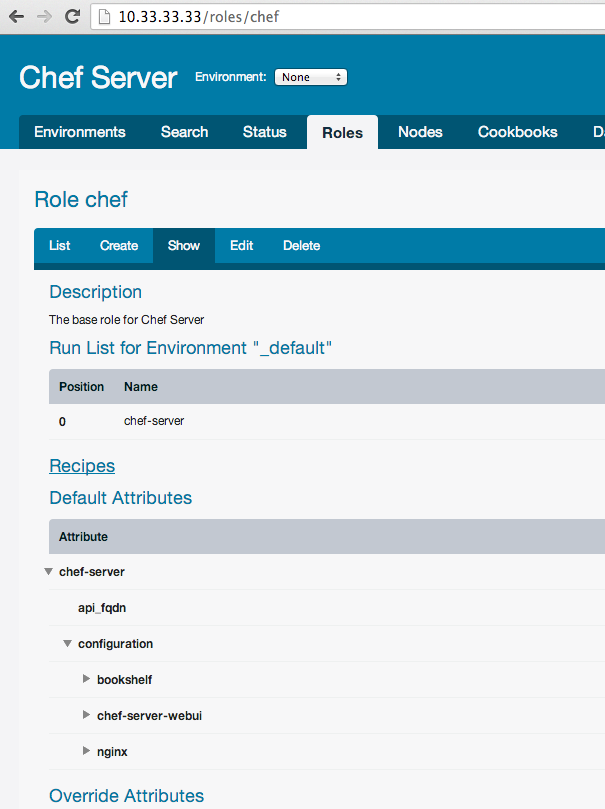
This is role in web interface:
Almoust the same commands for upload or update environment:
$ knife environment from file environments/*.json
Updated Environment staging!
Updated Environment production!
or nodes:
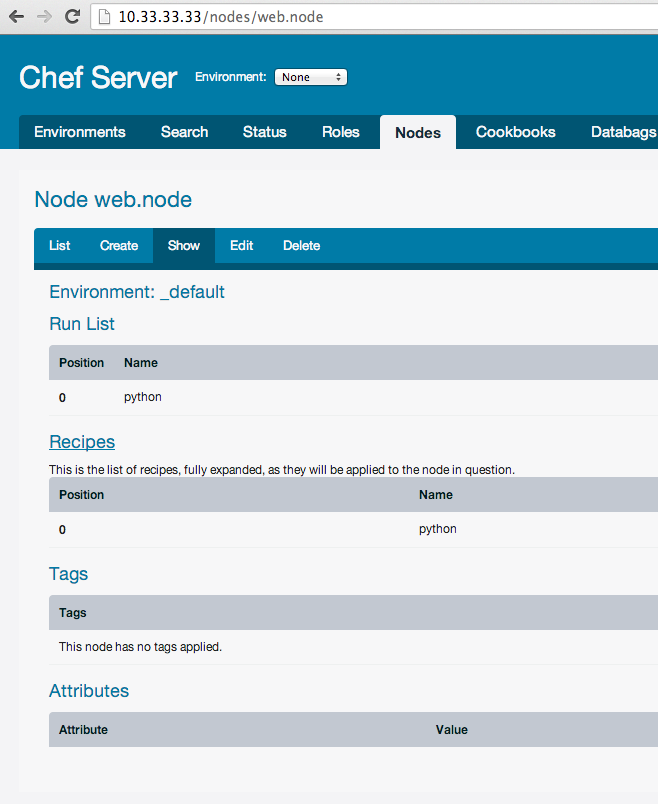
$ knife node from file nodes/*.json
Updated nodes/web.node.json
Also you can upload everything by command “upload”:
$ knife upload nodes
Created nodes/vagrant.json
Updated nodes/web.node.json
Just don’t forget to do this. Save current nodes, environments and roles also good point in git (hg, svn, etc.) repo, because if you will lose by some reason chef server, all cookbooks and recipes will saved.
Cooking of the nodes
Ok, so let’s cook our node “web.dev”. We will install on it python. So let’s add to “web.node” run list:
{
  "chef_type": "node",
  "json_class": "Chef::Node",
  "run_list": [
    "recipe[python]"
  ]
}
And update web.node on chef server:
$ knife upload nodes
Created nodes/vagrant.json
Updated nodes/web.node.json
By default chef client on nodes will not execute your run_list, but you can execute any command on nodes by command “ssh”. For example, run chef client on all nodes:
$ knife ssh 'name:*' 'sudo chef-client'For this command you can use ssh options:
$ knife ssh "name:*" "sudo chef-client" -x vagrant -a 10.33.33.50The ‘name:*’ is query, ‘sudo chef-client’ which we must execute on nodes, which found by this query. For example, show uptime only nodes with role web
$ knife ssh "role:web" "uptime" -x vagrantTo upgrade all nodes:
$ knife ssh "name:*" "sudo aptitude upgrade -y"But sometimes you may want update you servers automaticaly. For example, you just updated new cookbooks, roles and nodes and all nodes should automaticaly fetch new cookbooks and execute its, if it updated (and for you not critical update speed). We can use special cookbook “chef-client”. It allow for use bluepill, daemontools, runit or cron to configure your systems to run Chef Client as a service. Example of attributes for nodes:
{
  "name": "chef-client",
  "chef_type": "role",
  "json_class": "Chef::Role",
  "default_attributes": {
    "chef_client": {
      "interval": 1800,
      "init_style": "upstart",
      "config": {
        "client_fork": true
      }
    }
  },
  "description": "The base role for systems that have chef client",
  "run_list": [
    "recipe[chef-client]",
    "recipe[chef-client::config]"
  ]
}
So for each node you can add this role. It will check for updates chef server each 1800 sec (30 min).
Summary
In this article I am not cover many things about Chef server (advanced usage, knife-ec2, opsworks - based on chef solo, etc.), but I hope this should be enough for begin working with it.
All example code you can find here: github.com/le0pard/chef-server-example/tree/2.0.
That’s all folks! Thank you for reading till the end.
