Getting Started with Chef Server. Part 1
WARNING: This article can be outdated. Better read my book about Chef: Cooking Infrastructure by Chef
Hello my dear friends. Today we will continue talk about Chef Server. All example code you can find here: github.com/le0pard/chef-server-example/tree/1.0.
In this article we will learn what is Chef Server and how to setup it.
Before reading this article, I recommend reading a series of articles about the Chef Solo. In this series of articles I will explain only what I hasn’t already been covered in this Chef Solo series of articles.
What is Chef Server?
Chef is a Ruby-based configuration management engine.
The Chef Server acts as a hub, ensuring that the right cookbooks are used, that the right policies are applied, that all of the node objects are up-to-date, and that all of the nodes that will be maintained are registered and known to the Chef Server. The Chef Server distributes configuration details (such as recipes, templates, and file distributions) to every node within the organization. Chef then does as much of the configuration work as possible on the nodes themselves (and not on the Chef Server). This scalable approach distributes the configuration effort throughout the organization.
There are three types of Chef servers:
- Hosted Chef is a version of a Chef Server that is hosted by Opscode. Hosted Chef is cloud-based, scalable, and available (24x7/365), with resource-based access control. Hosted Chef has all of the automation capabilities of Chef, but without requiring it to be set up and managed from behind the firewall.
- Private Chef is a version of a Chef Server that is designed to provide all of the infrastructure automation capabilities of Chef, set up and managed from within the organization.
- Open Source Chef is an open source version of the Chef Server that contains much of the same functionality as Hosted Chef, but requires that each instance be configured and managed locally, including performing data migrations, applying updates to the Open Source Chef server, and ensuring that the Open Source Chef server scales as the local infrastructure it is supporting grows. Open Source Chef includes support from the Chef community, but does not include support directly from Opscode.
In the series of articles we will work with Open Source Chef.
What is difference between Chef Solo and Chef Server?
Chef Solo does not provide:
- Node data storage or search indexes.
- Centralized cookbook distribution.
- Environments, for setting policy of cookbook versions.
- A central API to interact with and use to integrate infrastructure components.
- Bulk operations with nodes.
As you can see, Chef Solo useful for small infrastructure (several servers), but if your you have huge amount of server - you must use Chef Server.
Environments
As you remember, Chef Solo have nodes, roles and data bags. Chef Server have additional policy: environments. An environment is a way to map an organization’s real-life workflow to what can be configured and managed when using Chef Server. Every Chef organization begins with a single environment called the “_default” environment, which cannot be modified (or deleted). Additional environments can be created, such as production, staging, testing, and development. Generally, an environment is also associated with one (or more) cookbook versions. An environment attribute can only be set to be a default attribute or an override attribute.
Attributes for recipes can be redefined in this way (except “override attributes”):
Defaults (lowest precedence) -> Environments -> Roles -> Nodes (highest precedence)
Chef version
In this series of articles we will work with Chef 11. You can read about changes in this Chef version by this link.
Initialize Chef Server project
To setup and configure Chef Server we will use Chef Solo (really? :). Chef Solo will help us quickly deploy Chef Server on a new server, if with it something happens (crash file system of server, etc.). Do not forget to make a backups of Chef Server (because compared with Chef Solo, Chef Server will be the point of failure in your configuration management system).
Let’s create our folder, which will contain all our Chef kitchen:
$ mkdir chef-server-example
$ cd chef-server-example
Next I will use bundler to get some useful gems:
$ cat Gemfile
  source :rubygems
  #
  gem 'chef', "~> 11.4.0"
  gem 'knife-solo'
  gem 'berkshelf'

$ bundle
And will create kitchen for Chef:
$ knife solo init .Berkshelf
As you remember, to manage cookbooks for Chef Solo we used librarian gem. For this tutorial I selected another good gem for manage a cookbooks dependencies - berkshelf. You can use any which like, but compared to the “librarian” the “berkshelf” has several pros:
- By default, berkshelf stores every version of a cookbook that you have ever installed in one folder on your local machine (the same workflow as for rubybems)
- Flexible configuring
- Build-in integration with Vagrant and Thor
- Adding sources of cookbooks to a groups (like have bundler)
Let’s create Berksfile file and add to it “chef-server” cookbook (this cookbook supported by Opscode):
$ cat Berksfile
#!/usr/bin/env ruby
#^syntax detection

site :opscode

cookbook 'chef-server',
  git: 'git://github.com/opscode-cookbooks/chef-server.git'

$ berks install
After launch of command “berks install” your cookbooks directory will be clear, because by default “berkshelf” install cookbooks into “~/.berkshelf” location. You can easily install your Cookbooks and their dependencies to a location other than default by argument “–path”:
$ berks install --path cookbooksBut right now we don’t need this.
Configure Chef Server node
After this we should configure for Chef Solo node for our Chef Server. I will do this by using role. First of all, we should create “chef.json” in folder role with content:
{
  "name": "chef",
  "chef_type": "role",
  "json_class": "Chef::Role",
  "description": "The base role for Chef Server",
  "default_attributes": {
    "chef-server": {
      "version": "latest",
      "configuration": {
        "chef_server_webui": {
          "enable": true
        }
      }
    }
  },
  "run_list": [
    "recipe[chef-server::default]"
  ]
}
By “configuration” key you can change settings for Chef Server. All available setting, which is possible to redefined, you can find here.
Next we should create node “vagrant.json” with content:
{
  "run_list": [
    "role[chef]"
  ]
}
We are ready for testing this Chef Server kitchen.
Vagrant
For testing Chef Server by vagrant we need download vagrant box. List of boxes you can find at www.vagrantbox.es.
$ vagrant box add precise64 http://dl.dropbox.com/u/1537815/precise64.box
$ vagrant init precise64
Next we need modeling a cluster of machines by vagrant. Let’s modify Vagrantfile:
host_cache_path = File.expand_path("../.cache", __FILE__)
guest_cache_path = "/tmp/vagrant-cache"

# ensure the cache path exists
FileUtils.mkdir(host_cache_path) unless File.exist?(host_cache_path)

Vagrant::Config.run do |config|

  config.vm.define :chef do |chef_config|
    config.vm.customize ["modifyvm", :id, "--cpus", 2]
    config.vm.customize ["modifyvm", :id, "--memory", 1024]

    chef_config.vm.box = "precise64"
    chef_config.vm.network :hostonly, "10.33.33.33"
    chef_config.vm.share_folder "cache", guest_cache_path, host_cache_path

    VAGRANT_JSON = JSON.parse(Pathname(__FILE__).dirname.join('nodes', 'vagrant.json').read)

    chef_config.vm.provision :chef_solo do |chef|
       chef.cookbooks_path = ["site-cookbooks", "cookbooks"]
       chef.roles_path = "roles"
       chef.data_bags_path = "data_bags"
       chef.provisioning_path = guest_cache_path

       chef.run_list = VAGRANT_JSON.delete('run_list')
       chef.json = VAGRANT_JSON
       # old way
       #VAGRANT_JSON['run_list'].each do |recipe|
       # chef.add_recipe(recipe)
       #end if VAGRANT_JSON['run_list']

       Dir.glob(Pathname(__FILE__).dirname.join('roles', '*.json')).each do |role|
        chef.add_role(Pathname.new(role).basename(".*").to_s)
       end
    end
  end

  config.vm.define :chef_client do |chef_client_config|
    chef_client_config.vm.box = "precise64"
    chef_client_config.vm.network :hostonly, "10.33.33.50"
  end
end
We set two nodes by this configuration: chef (Chef Server) and chef_client (client of Chef Server). We use “hostonly” network for this servers. In this case both of this servers will be available by IPs: 10.33.33.33 and 10.33.33.50. Also doesn’t need to do forward ports, because services on this servers will be available by this IPs. More about “Multi-VM Environments” and “Chef Solo Provisioning” you can find by this links.
Let’s create our nodes:
$ vagrant up
/Users/leo/.rvm/gems/ruby-1.9.3-p385/gems/hashie-2.0.0/lib/hashie/mash.rb:80: warning: redefining `object_id' may cause serious problems
[chef] Importing base box 'precise64'...

...

[Berkshelf] installing cookbooks...
[Berkshelf] Installing chef-server (2.0.0) from git: 'git://github.com/opscode-cookbooks/chef-server.git' with branch: 'a3b94e30b599f901eee2eb1af5bc1f4ef011cae4'

...

[chef] Running chef-solo...
stdin: is not a tty
[Sat, 16 Feb 2013 12:09:03 +0000] INFO: *** Chef 0.10.10 ***
[Sat, 16 Feb 2013 12:09:03 +0000] INFO: Setting the run_list to ["role[chef]"] from JSON
[Sat, 16 Feb 2013 12:09:03 +0000] INFO: Run List is [role[chef]]
[Sat, 16 Feb 2013 12:09:03 +0000] INFO: Run List expands to [chef-server::default]
[Sat, 16 Feb 2013 12:09:03 +0000] INFO: Starting Chef Run for precise64
[Sat, 16 Feb 2013 12:09:03 +0000] INFO: Running start handlers
[Sat, 16 Feb 2013 12:09:03 +0000] INFO: Start handlers complete.
[Sat, 16 Feb 2013 12:09:03 +0000] INFO: Omnitruck download-server request: http://www.opscode.com/chef/download-server?p=ubuntu&pv=12.04&m=x86_64&v=latest&prerelease=false&nightlies=false

...

[Sat, 16 Feb 2013 12:17:59 +0000] INFO: Chef Run complete in 536.107466 seconds
[Sat, 16 Feb 2013 12:17:59 +0000] INFO: Running report handlers
[Sat, 16 Feb 2013 12:17:59 +0000] INFO: Report handlers complete
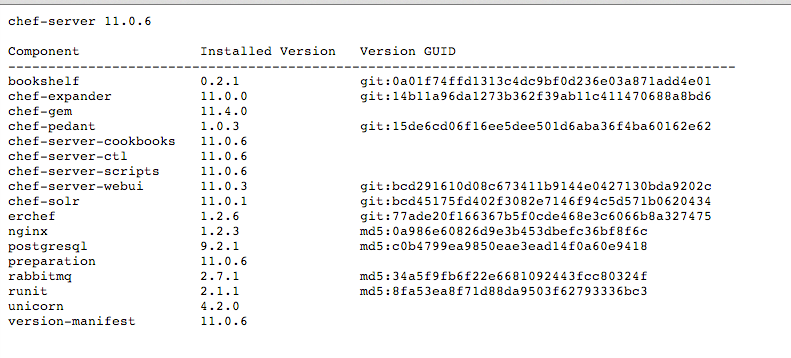
Our Chef Server by default takes your systems FQDN as Chef Server url. We can check Chef Server web interface by “https://10.33.33.33” and info about versions by “https://10.33.33.33/version” url. It should looks like this:
After login by “admin/p@ssw0rd1” you must change admin password to some secure password.
SSH keys
After installation Chef Server with default settings, Chef will generate pem keys, which will be used for knife (command line tool for Chef) and Chef clients for authentication with server. We should copy its from our Chef Server to “.chef” directory in project:
$ vagrant ssh chef
Welcome to Ubuntu 12.04.1 LTS (GNU/Linux 3.2.0-23-generic x86_64)

 * Documentation:  https://help.ubuntu.com/
Welcome to your Vagrant-built virtual machine.
Last login: Mon Aug 20 19:28:45 2012 from 10.0.2.2
vagrant@precise64:~$ sudo cp /etc/chef-server/*.pem /vagrant/.chef/
On prodution you can use scp command for this.
Knife configuration
Next we should create for knife configuration file (knife should know how to communicate with Chef Server):
$ knife configure -i
WARNING: No knife configuration file found
Where should I put the config file? [/Users/leo/.chef/knife.rb] .chef/knife.rb
Please enter the chef server URL: [http://macbookproleo:4000] https://10.33.33.33
Please enter a clientname for the new client: [leo] admin
Please enter the existing admin clientname: [chef-webui]
Please enter the location of the existing admin client's private key: [/etc/chef/webui.pem] .chef/webui.pem
Please enter the validation clientname: [chef-validator]
Please enter the location of the validation key: [/etc/chef/validation.pem] .chef/validation.pem
Please enter the path to a chef repository (or leave blank):
Creating initial API user...
If you have such error:
ERROR: knife encountered an unexpected error
This may be a bug in the 'configure' knife command or plugin
Please collect the output of this command with the `-VV` option before filing a bug report.
Exception: NoMethodError: undefined method `save' for #<Hash:0x007fa8fe123668>
This mean, what you are using chef version 11.0.0. This bug fixed in version 11.4.0.
As a result, you should have a file “.chef/knife.rb” with similar content:
log_level                :info
log_location             STDOUT
node_name                'admin'
client_key               '/Users/leo/programs/projects/chef-server-example/.chef/admin.pem'
validation_client_name   'chef-validator'
validation_key           '/Users/leo/programs/projects/chef-server-example/.chef/validation.pem'
chef_server_url          'https://10.33.33.33'
syntax_check_cache_path  '/Users/leo/programs/projects/chef-server-example/.chef/syntax_check_cache'
Let’s check knife configuration:
$ knife client list
chef-validator
chef-webui
If you see error on command “knife client list” - check you knife configuration, you pem keys and availability of Chef server.
Bootstrap first node
Once the Chef Server workstation is configured, it can be used to install Chef on one (or more) nodes across the organization using a Knife bootstrap operation. The “knife bootstrap” command is used to SSH into the target machine, and then do what is needed to allow the chef-client to run on the node. It will install the chef-client executable (if necessary), generate keys, and register the node with the Chef Server. The bootstrap operation requires the IP address or FQDN of the target system, the SSH credentials (username, password or identity file) for an account that has root access to the node, and (if the operating system is not Ubuntu, which is the default distribution used by knife bootstrap) the operating system running on the target system.
So let’s do this:
$ knife bootstrap 10.33.33.50 -x vagrant -P vagrant --sudo --node-name web.node
Bootstrapping Chef on 10.33.33.50
10.33.33.50 --2013-02-16 16:08:36--  http://opscode.com/chef/install.sh
10.33.33.50 Resolving opscode.com (opscode.com)...
10.33.33.50 184.106.28.82
10.33.33.50 Connecting to opscode.com (opscode.com)|184.106.28.82|:80...
10.33.33.50 connected.

...

10.33.33.50 Starting Chef Client, version 11.0.0
10.33.33.50 Creating a new client identity for precise64 using the validator key.
10.33.33.50 resolving cookbooks for run list: []
10.33.33.50 Synchronizing Cookbooks:
10.33.33.50 Compiling Cookbooks...
10.33.33.50 [2013-02-16T16:09:13+00:00] WARN: Node precise64 has an empty run list.
10.33.33.50 Converging 0 resources
10.33.33.50 Chef Client finished, 0 resources updated
Let’s check clients on Chef Server:
$ knife client list
chef-validator
chef-webui
web.node
As you can see we get new client “web.dev”.
$ knife client show web.node
dmin:      false
chef_type:  client
json_class: Chef::ApiClient
name:       web.node
public_key: -----BEGIN PUBLIC KEY-----
MIIBIjANBgkqhkiG9w0BAQEFAAOCAQ8AMIIBCgKCAQEA0RnjCJrOVkMAmD/IaUIZ
LujnOpDSJlP9U/5KTDn+/x/7oDeSUlLbnS190u7kxiOL6E6Ea4eorc//82SR/PP3
eeEAQbwaDrM7WaKgUige5UQWYOTJbXzCldQafzlYDR+5I6GgRPSyTQxs6JYcC5lG
5AYokbl97TQtceFhg1oA2gYPmCgtCjGVU3Z2d0XFzrIs/3jpZVPaLSgZgVB2hufp
Tnx+cVMlPCc3P4I0UwNhauD6YaRBriAa/Sap+9sbsBizqjvz2aGSwyTdAiFtqmqs
xoiSt7Sl9H+GIaMnePr3TShCFS/Oh+u5RAONvFaHNInB54pFaIssyWlYrwA2FaF+
UQIDAQAB
-----END PUBLIC KEY-----
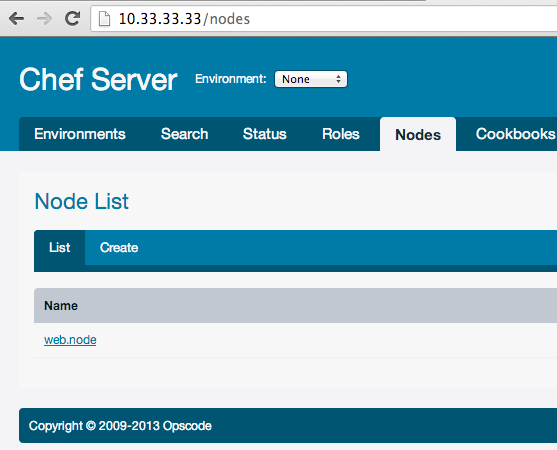
You also can see this client in Chef Server web interface:
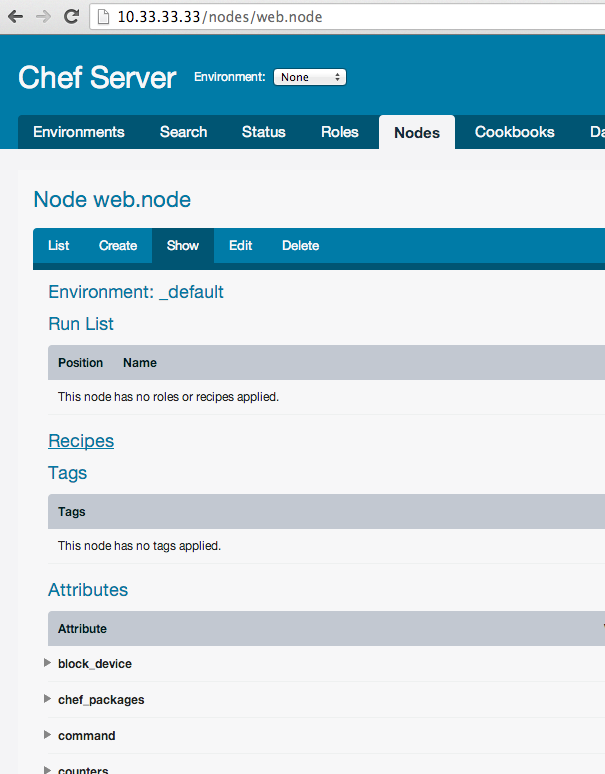
And new registered node:
$ knife node list
web.chef-node
Summary
In the current article we have learn what is Chef Server and how to setup it. In next article I will cover how to work with Chef Server.
All example code you can find here: github.com/le0pard/chef-server-example/tree/1.0.
That’s all folks! Thank you for reading till the end.


